General
- Reinhardt Corp. – parent site of multi-site. See site list and IDs under My Sites > Network Admin > Sites (upper left). Each company site is a sub-site.
- My Sites > Network Admin > Plugins are updated here. Leave this up to me since backup is recommended first. I will be alerted if any of them become critical.
- The Distributor plugin is being used as a handy way to create a master in ReinhardtCorp and to push (or pull) Pages and Posts to sub-sites. Pages and Posts can be unlinked from the master if needed (see behavioral comment below). Generally News Posts won’t need to be since they are the same in every site. Generally Pages will need to be since they are slightly different in each site. Update: Never re-link Pages to the original parent page–too risky since originals were made for RHH. (Even universal pages like Privacy have different sidebars.) Another note since the major push was done: the reinhardtcorp parent site is not really a “template” anymore for various reason: many reusable blocks were converted to regular, I found some instances where the URLs were not relative and did not fix, I did not update the Ready? blocks to include Commercial App. It can still be used to create a new page and push it. A reminder of the intended use: to push Posts of Latest News.
 Use “My Sites” primarily to switch between sites 1) after Pages and Posts are pushed if changes at the sub-site level are needed, or 2) to do any work at the sub-site level such as testimonials, upload site-specific PDFs… The image at right shows hovering over Reese in blue to go to Dashboard.
- The admin panels do not always reflect WYSIWYG. For example, the default heading color of sidebar widgets and blocks is yellow but this does not show unless the color was specified in the page or if any colors have been specified in reusable blocks. Second example: testimonials text is larger and lighter than it will appear. Changes can be made …………
- Child pages have a different URL structure from the existing websites. For example, in the current site, /services-service-agreements.php will become /services-new-york-fuel-products/service-agreements/ and /about-contact-reinhardt-home-heating.php will become /about/contact/, under their parent page URLs.
Please review general WordPress Classic documentation on my website, https://www.madriverweb.com/client-pages/wordpress-basic-documentation/, WordPress Block documentation on my website, https://www.madriverweb.com/client-pages/wordpress-basic-documentation-blocks/, or search the internet as needed. Documentation below is specific to this site.
We are working in both Classic and Block mode. The ReinhardtCorp parent site is defaulted to Classic mode so as to facilitate ease of copying News content from new documents. It does not have to stay this way if you find the Block editor to be your preference, and any new document created in Classic can easily be converted to Block individually once started. The convenience of Classic is all content is in one “block” whereas in Block each paragraph, image, list, etc., is a separate block. Movement in Classic is cut and paste; movement in Block is drag and drop or arrow up/down.
The sub-sites are defaulted to Block mode but this is irrelevant if all posts and pages are created in parent site reinhardtcorp.
A reminder that the Screen Options in the upper right of any list or Classic post/page can help you de-clutter or find a feature not currently visible. In Blocks mode: my page above discusses the icons at upper right and left. As long as the Settings icon (gear) is selected upper right, all possible settings are available in expanded dropdowns within Page or Block tabs.
Tips:
- Use Shift Enter to make a single line break (instead of a double line new paragraph).
- “Preserve formatting” by putting cursor in the middle of a list item or section of text, delete most, add new, then delete beginning and ending.
- In a list of links, use arrow key to get outside the link before hitting enter to add a new item.
Starting with the “pieces” first–most converted from includes in the old sites:
Widgets
Appearance > Widgets: Unique/created in each company site and easily modified. Only at the edges of the site.
- The footer widgets populate all pages.
- The primary sidebar contains widgets that populate only the sidebar of the Posts and the Latest News posts archive page. (We agreed that the Related Pages would be the same for all news posts and the Latest News archive page (to save an excessive level of customization).)
- The seasonal Office Hours widget not currently used is stored in the Inactive Widgets near the bottom. Swap these by dragging; modify as desired. (Header color is tied to the actual widget through a method not accessible to you.)
Blocks
Accessible while within a page (or post). Sample page is good to practice in. More on specialized blocks below.
- New typing will default to paragraph block. Typing a few letters within a paragraph block is a great placeholder and can also be a good way to delete stray paragraph blocks.
- Some block types can be changed by selecting the block-type icon upper left to see the choices.
- Many are “reusable” and, if edited, will be changed globally (in all locations used). If an edit is needed, see paragraph below.
- Two reusable blocks (existing only in reinhardtcorp) form the basis of the page template and are named “… Convert” to remind you to convert it to a regular block once inserted within the page.
- To add a new styled “panel” in the page sidebar, start by adding a “group” block, then a heading block set to H3 inside the group, then a paragraph or list.
- The right-hand column of the page specifies a “page-sidebar” style so that any new H3 blocks can be assigned a background color in the sidebar and will be shaped consistently.
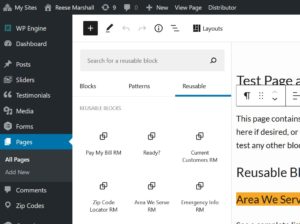 I made a Test Page and Reusable Blocks in each site. I found while I was working with these in the admin that too many on a page caused poor performance and they didn’t always load. Since I got one page done successfully, it gives you a snapshot of how they all look. I’m leaving the other pages unfinished, but you can still use them to pull in a block to modify or do other testing and trial. As discussed in our Zoom, while on the Test Page or any page, click the “+” in the upper left (see screenshot at right) and the Reusable Blocks tab to see those available for each site (which is now a cleaned up list).
Within a sub-site, there are several reusable block editing choices:
- In the icon bar, you can convert to regular block, but you do not likely need to or want to do this.
- The three dots at right offer you to Remove from Reusable blocks, but you do not likely want to do this either.
- You may want to remove the block if you have chosen the wrong one. That choice removes the reusable block from the page but keeps it intact.
- To edit the reusable block, at the right of the block name, click Edit. The title will be highlighted but you will not likely want to change this. Click into the heading or paragraph/list to make the desired edits. Then find the Name bar (which could be hidden if you just edited the heading) and click Save.
- The list of reusable blocks within each site can be accessed by pasting /wp-admin/edit.php?post_type=wp_block after the domain portion of the URL.
Pages, Posts
You may work in any individual company site or in the “parent” site, reinhardtcorp. Both of these content types has initially been created in the parent site and distributed/pushed to the company site (sub-site), retaining a handy reference of all main-column content in the reinhardtcorp summary lists. A page or post can be written at the company level, but you will likely find that visibility of all pages and posts in the reinhardtcorp master company lists is helpful.
Post: if modification needed, do so in the parent site; they are the same in every sub-site. An edit in the parent site will automatically filter through to sub-sites. A post can only be changed in a sub-site if it is detached from the original ReinhardtCorp post. (Detaching it from the original will cause it to have a new published date and this will not change back if relinked thus potentially making the Posts display out of order. Published date on an unlinked post can be manually edited.)
When writing new News Posts (currently set for Classic mode):
- Click “Add New” near the top of the admin (when in the Post list) or in the sidebar.
- Give it a meaningful, keyword-rich title so it creates a useful permalink.
- Upper right, Publish.
- Then change the title if you wish to something more marketing-oriented, but recognize this can be confusing if some people see the differences between the visible title and the URL.
- If the post pertains to less than four companies, categorize at right for visibility in the Post list which companies it pertains.
- For best display, set a Featured Image in the right sidebar and include that same image, choosing the appropriate size, somewhere within your content. You may put more than one image within content, or an alternate image. The Featured image displays in the Resource Center and the Latest News archive page but not on the single post.
- Click Update. Preview/review.
- When ready for publishing, hover over “Distributor” in top menu, click the sites that it will be pushed to, un-select Draft, Distribute. (It will automatically add to the Latest News and Resources pages.)
To create a new Page (best still to start in reinhardtcorp where the Page Template Convert* exists and push to company sites):
*These instructions have been modified after pushing the BioHeat® page because there is (still) a glitch in the push process that results in the contents being pushed in a Classic Block. The page setup and completion needs to be done in each sub-site. The instructions moved from the ReinhardtCorp site to the sub-sites have been grayed-out.
- Click “Add New” near the top of the admin (when in the Page list) or in the sidebar.
- Give it a title. Enter.
- Upper right, Publish.
- IF the page was created in Classic mode, in the right sidebar under Editor, Switch to block editor.
- (Click the “+” sign and search for Page Template Convert block, select. (This can also be located within the upper left “+” Reusable Blocks tab.))
- (In the Formatting bar, select the More Options icon, and convert to regular block.)
- Type or paste your content (in the left column) using whichever blocks are appropriate. While working in a particular block, available customization options are shown in the sidebar under the Blocks tab.
- (The right column of the template includes one Related Pages Template Convert which you will also have to convert to a regular block.)
- (In the right column, add other reusable blocks as needed.)
- (Select a parent page if appropriate in right sidebar in Page Attributes (under Document tab, Block editor).)
A page pushed from the parent site will need to be 1) unlinked and modified in each company sub-site. You can readily see if a page has been pushed within Distributor by the check mark and “View.” Pages that have been pushed and unlinked can be seen as a grayed-out circular icon in the sub-site Page list. A new page will also need to be 2) nested under a parent if appropriate (right sidebar) and 3) added to the menu.
Once pushed to the company site:
- Unlink the page from the push.
- Click the “+” sign below page title, search for Page Template Convert block, select. (This can also be located within the upper left “+” Reusable Blocks tab once the space is created.)
- In the Formatting bar, select the More Options icon, and convert to regular block.
- Move content from the pushed Classic block into the left column by highlighting all and dragging/drop.
- Select a parent page if appropriate in right sidebar in Page Attributes (under Document tab, Block editor).
- Add to the navigation menu.
Do this in all three companies.
Page elements:
- There are numerous “styles” input in various places in the sidebar “Advanced” dropdown in the CSS class field. This is to give you more control, although you have to know what is pre-programmed. “Indent” is used with paragraphs (because a tab doesn’t work the same way in html. Others are noted below.
- Some pages have wide images at top of content column. The system chooses the appropriate size (950px). No alignment.
- For H2 and H5 headings with backgrounds such as on About Us, highlight the left column and add “freeform” in the Advanced tab “add a CSS style” field.
- Suggest using H2 and H4 headings in left column in general.
- H3 headings in right column are highlighted either in the Advanced tab CSS field (with “gold,” “red”) or in the Color Settings background color. I’ve made the effort to move them all to the color background once that was established.
- Add an accordion, add paragraph, message and/or lists, footer inside of it. With cursor in panel heading, first panel “open” can be selected in sidebar. Add heading open/hover color under Advanced CSS by inputting “orange-heading” or “blue-heading” (for mini-marts). The Service Agreements page also has additional colors gold, melon, red.
- There are numerous stored footers in the reusable blocks.
- To make/add a new footer, use a paragraph block, add text and links as desired, separated by “|”. In the sidebar under Advanced, add the CSS class “footerac” to give it the top border/separator and font size.
Typical mistakes and quirks to watch for:
- Phone numbers: links same as visible number, input as tel:3158241970.
- In Related Pages, when modifying more than one link, quirky. I clicked outside to a regular paragraph then entered second link needing mod.
- I had to save pages twice when working on forms.
Media
Media includes images and PDFs (at least). Once uploaded, image and PDF filenames cannot be changed.*
Some images from existing site have been moved over in bulk in a folder and are not accessible in the media gallery. To replace an image or add new, upload it to the gallery and then insert it into the page or post.
Be cautious about deleting images even if tempted to clean up the image gallery in case they are used somewhere.
*It is not a seamless process to delete an image and re-upload with same name. Best to just upload new and re-link.
Sliders
- Settings for top of page sliders: no dots, yes arrows, yes loop, yes autoplay, slide, 6000, 1000, 300 mobile height, 450 desktop height. There is also a style in the style sheet to make the height 375px between “mobile” 600px wide and 768px wide (better display on tablet).
- These all use 1900x450px images and display the most appropriate size on smaller windows and devices.
- Update: When adding the image, make sure you add it by clicking “Add or Upload File” beside the image field. Do not add it in the content field. Easier to make this mistake in minimarts where there is no content.
PDFs
Upload to Media Gallery. Link from page.** I prefer to “open in a new tab” so as not to leave the site if the PDF is closed.
**Linking within a page to a PDF is not as handy as other linking. Copy the relative*** filename from the media file (full URL also acceptable) and paste it into the link box. ***A relative filename is everything after and including the slash, ex: /wp-content/uploads/…
The best way to manage PDFs that will be periodically updated, especially when linked from reusable blocks, is to delete and re-upload in the sub-site with the same filename so the link within the page/block is retained. We decided to use the existing company code naming convention, example: RHHCustomerApplication.pdf. Note: I observed the minimart employment application to be different for RMM and TC because shared.
In some cases, such as the BioHeat Tax Forms, I chose to upload the new with the year in the URL so there is no question people have the right one. This requires re-linking.
- Take spaces out of filenames (so the URL doesn’t do anything funky).
- Open admin, each website.
- Upload both forms to each website Media Library.
- Open each one individually and click “copy URL.”
- Open BioHeat FAQ page. Click into appropriate form link. Click the pencil. Delete the old URL and paste the new one. Hit curved submit arrow. Repeat with other form. Save page.
- Go to live websites, refresh, and test that forms have been replaced and load properly.
- Change the dates in the last line of the paragraph above the form links.
Testimonials
Can be entered in two places: 1) on a Testimonials page within one of the websites (since they will be different between companies), 2) on the home page slider. There is not currently a way to enter once and select for it to be displayed in two places.
- 1) Open the individual site’s “Testimonials” page. Assuming you want to put the newest first, hit Enter after the opening paragraph, click the “+” and type a “q” to add the “Quote” block (not the Testimonial block). Add the testimonial and citation where designated. Drag and drop or use arrows to reorder if desired.
- 1b) Testimonials can also be randomly added in other pages as highlights.
- 2) Testimonials for the Home Page Testimonial slider are added upper left independently in the Testimonials menu item. Place the citation in the “Company Name” field in the right sidebar.
Messages
The “message” format (icon, title, message content) is used on the home page under the slider and within numerous other pages.
- Reusable messages have been created for the home pages.
- These can be swapped out within the column by deleted and selecting new. Click into the message, click the triple-dot icon “More Options” upper right, remove block. Click the plus sign that is clearly still in the right place, search for “Message…”
- Those within other pages are created on the fly.
- New ones can be generated by clicking on the plus sign and searching for “Icon Message Block” within the Text blocks repository. Then add the info.
- If you create new ones to be used in multiple places, you may save them as reusable.
Zip Codes
I would suggest getting my help when any changes are needed, but for completeness, I’m including a technical explanation here.
[There is an unused custom post type called Zip Codes in the left admin menu. This was my original approach. I do not want to delete all this work in case we choose to use it someday, or at least until some time has passed using the form approach.
The ReinhardtCorp parent site includes all zip codes as a custom post type, with those served by multiple companies duplicated. The duplicate titles–the actual zip codes–are differentiated in the permalink by a -2, 3, 4, or 5 for Reinhardt, Reese, Paul, and SD respectively (corresponding to their sub-site ID). Query logic is contained within the individual sub-sites. For Reese, for example, in the middle of your region, if a duplicate existed in the overlap areas, they are removed from Reese’s sub-site because “yes, you are in our service area” and no alternates need be displayed. That is why Reese has the fewest remaining of the original total of 116. Zip codes not in ReinhardtCorp’s service area and alternates will be displayed accordingly by querying those found in the sub-site.]
The Zip Code functionality was implemented with Gravity Forms. A simple one field form feeds numerous confirmation pages based on logic matching the zips to companies or not. The logic was first worked out in the master spreadsheet and then copied into Confirmation pages that serve as redirects.
The easiest way to implement the zip code search field was to modify the Area We Serve block to be exactly as we intended the Zip Code Locator block to be, rather than take the time to swap them out of numerous pages in each site. These blocks are now the same content and Zip Code Locator is used nowhere. I renamed all the Area We Serve blocks to Area We Serve Search to be more intuitive.
The single-field form is included by a shortcode in the Reusable blocks Area We Serve Search and Zip Code Locator, currently identical in each site.
I created an Alternate Company Related Pages reusable block for the “alternate company” pages since there are multiples in each site, also a couple reusable blocks for the opening text, in case any updates are desired.
I created a Recommended Alternate List Convert which is a template with the four companies’ contact info simply for ease of insertion. I first converted to regular block, then deleted the unnecessary companies listed. Not sure if we will find this useful anywhere else.
Plugins
Distributor Plugin Detail, Issues, Behaviors
NOTE not ideal behaviors:
- NOTE not ideal behavior: Once a (Page or) Post is unlinked, it can be relinked, but the original publish date will be lost. This can be manually updated.
- NOTE not ideal behavior: If the original post or page has a typo that is later fixed, the published date on the sub-site will change to the current timestamp. This would seem to only be a problem with Posts, which should reflect and retain the published time and therefore the order within the Latest News archive page. So, proof carefully. If you change later and lose your timestamps on the sub-sites, you have to fix in each/four sites.
Better Font Awesome
The icons are inserted with html such as <i class=”fas fa-map-marker-alt fa-2x”> which you can review in the text tab of any widget, or with “shortcode” ex: or when no words are included such as the Facebook icon in the RMM header. (The widget will not retain the html when no words are present.) (You will only see the shortcode in the admin and the rendered icon on this live page.)
The plugin allows use of Series 4 or 5 (and 6 in beta).
- The “i” for italics is simply the tag that FA choses to use for the html version.
- Fa, in the first position, is used for the FontAwesome 4 series. These may become deprecated.
- Fas, fab, far represent solid, brand, regular in the FontAwesome 5 series. Use whatever they specify.
- We generally add “fa-2x” to the html versions to make it twice as large.
- I had to add “lg” to the shortcode version in RMM because it was pulling an icon from FA4.
- Bottom line: some experimenting may be required.
Font Awesome 4 https://fontawesome.com/v4.7.0/icons/
Font Awesome 5 https://fontawesome.com/icons
Customizer
You should not need to use this; mostly here for documentation. All notes pertain to Appearance > Customize >.
Theme Settings > Footer: specify image already uploaded to media. Change <img src=”/wp-content/uploads/warm-cool.png”> to <img src=”/wp-content/uploads/warm-fueled.png”> as needed.
Additional CSS: this code is needed to properly format Gravity Forms due to style sheet hierarchies.
Integration of Equipment and Services into PO and SD at a later date
Modify pages as needed for each company. Change from draft to published. Add to main nav Header Right in Appearance > Menu. Open Site Map page and add, similar to RHH and RM.
Portal is Down (temporary notice)
Simple Portal is Down page was created in ReinhardtCorp, pushed with Distributor to the four sites. If you want to change the content, you can update it in ReinhardtCorp and it will flow through to each site automatically.
Note: in each sub-site (company site) Page list, this is the only page that will show it has not been separated (detached) from the parent.
Current content: Ooops! Our customer portal is temporarily unavailable. Please check back soon.
While portal is down, Appearance Menu (Above Header Menu) first custom link was changed from:
https://ourenergyportal.com/reinhardt/
https://ourenergyportal.com/reesemarshall/
https://ourenergyportal.com/pauloil/
https://ourenergyportal.com/sdpetroleum/
to (universal in each site):
/portal-is-down/
Note: the link does still open a new window for simplicity so as not to have to modify something else.
When portal is back up, paste each energy portal link back into each company site.
Archives (moot)
Until we are sure we have everything as we want, once the domain names are moved, we can reference the old websites at the following URLs (for about a month):
http://142.4.9.238/~warmfrie/reinhardt
http://142.4.9.238/~warmfrie/reesemarshall
http://142.4.9.238/~warmfrie/pauloil
http://142.4.9.238/~warmfrie/sdpetroleum
http://142.4.9.238/~warmfrie/rmm
http://142.4.9.238/~warmfrie/thecenter
http://142.4.9.238/~warmfrie/sdmm
ALWAYS CHECK YOUR WORK ON THE LIVE WEBSITE(S) AND MULTIPLE DEVICES!!!